Enabling and Disabling Hyper-V in Powershell
Running VirtualBox or other virtualization software on Windows 10 often means turning Hyper-V off. Two PowerShell commands make enabling and disabling it quick.
I sometimes find myself having to disable Hyper-V in Windows 10 temporarily in order to run some other virtualization software like VirtualBox. While it is possible to enable and disable Hyper-V in Window Features, I find it a lot more convenient running a Powershell command to enable and disable it.
Solution
-
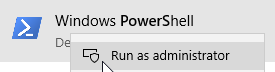
Open an elevated Powershell window. You can do this by searching for Windows Powershell in the search menu, right-clicking it and selecting Run as administrator
-
Run the following commands to enable/disable Hyper-V:
Enable Hyper-V
Ps Enable-WindowsOptionalFeature -Online -FeatureName Microsoft-Hyper-V –AllDisable Hyper-V
Ps Disable-WindowsOptionalFeature -Online -FeatureName Microsoft-Hyper-V-All -
Restart your computer for the changes to take effect.
Closing
I hope you found this article useful. Please contact me if you have any questions or suggestions.